Part 8: Forms & Contact Form
Here we'll show you how to create a form, some commmon elements in a form, and then we'll add javascript to use your Mac Mail or similar to send your form info via email.
(If we were working with a server that allowed the computer language php, we would use that because we could have the contact page send the email directly without having to rely on Apple Mail, Microsoft Outlook, etc.)
There should not be any requirements to use Dreamweaver for this section.
Create the form
Forms allow you to enter information on a web page, and then through various more advanced coding techniques to add that information to a database for reuse later, send it in an imail, apply it to parts of your web page, etc.
This form uses several types of fields; other fields, such as checkboxes and radio buttons, can be seen at https://www.w3schools.com/html/html_forms.asp
Open content.html and delete the content of the <main>.
Type:
<h2>Contact us:</h2>
<form action="mailto:sample@sample.com" method="post" enctype="text/plain">
<!-- Action should be changed to your email address.-->
<!-- method can be POST or GET. Always use POST if the form data contains sensitive or personal information. The POST method does not display the submitted form data in the page address field. POST has no size limitations, and can be used to send large amounts of data. -->
	<!-- Form fields go here -->
</form>
This creates the form.
Create form fields
First we'll add the fields for your first and last names.
After the comments after the opening <form> element, add:
<input type="text" name="firstname" required autofocus placeholder="First Name">
<input type="text" name="lastname" required placeholder="Last Name">
The input type for these is a text field; we're naming the fields "firstname" and "lastname" which tells us what they are and makes them accessible to the javascript.
the user is "required" to fill out these fields; autofocus means that "firstname" will be selected when the user goes to this page, so they don't have to click on the first field to start filling it out; and "placeholder" is text that appears in the form, indicating what should be typed in the field but won't be actual type in that field.
Add email field
Type:
<input type="email" name="mail" required placeholder="Enter a valid email address">

			<!-- Field will automatically check for a valid email format -->
Add options for reason to contact
Type:
<select name="reason">
	<option value="instruction">I'm looking for instruction</option>
	<option value="newsletter">I'd like to receive performance announcements</option>
	<option value="other">Other</option>
	<option value="web_error">Website Error</option>
</select>
Add comment area
Type:
<textarea name="comment" cols="60" rows="4" placeholder="Comments"></textarea>
<!-- cols = how many characters on a line are normally displayed and rows = indicated how many lines are displayed. -->
Add Send and Reset buttons
Type:
<button type="send" value="Send">Send</button>

			<input type="reset" value="Reset">
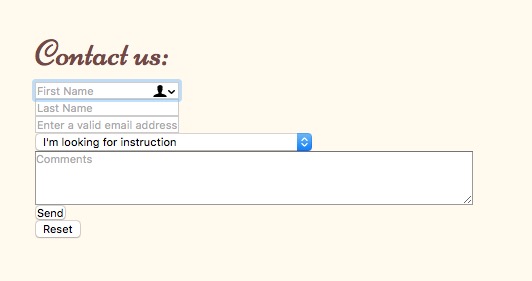
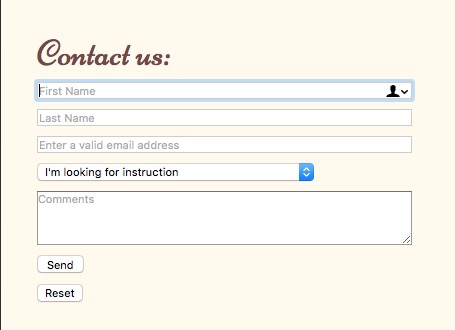
Form elements display inline by default, so when previewed your form will look like this:
Checking to make sure it works
Before we go to all the trouble to style this form, check first to make sure it works.
Make sure you have entered your email address in the opening <form> field.
Open contact.html in a browser. Enter information in the form fields and click the Send button. Your email client should open and an email ready to send should appear, complete with the information from the form.
If not, there is a coding error somewhere. If some of the output is missing, you may be missing part of the instruction. If the email client doesn't open, check the javascript carefully. Also, try the form in several browsers to make sure it isn't a browser-specific error.
Styling the form
Create a section in your style.css sheet and call it /* FORMS */.
Add some margin under the form for the mobile versions:
form: {margin-bottom:20px;}
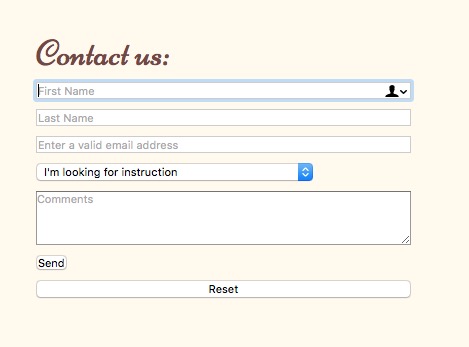
Then make the form elements display as block elements:
input, select, textarea, button {display:block;}
Which looks like this:
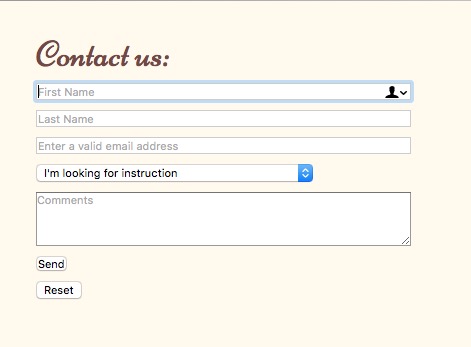
Everything is crashed together, so let's add some margin to the elements. We also need some space below the <h2> head, but it's difficult to specify that, so let's also add some margin to the top of the form:
form: {margin:10px 0 20px 0;}

			input, select, textarea, button {display:block; margin-bottom:10px;}

Now the First Name, Last Name and Email fields are too short. Let's make them wider:
input, textarea {width:375px;}
But what's happened to our Reset button? Turns out that the reset button is also an input, so it is also the same with as the rest of the inputs. We're going to have to be more specific. We can specify the input buttons we want to style by using the type that we've specified for each:
input[type=text], input[type=email], textarea {width:375px;}
Finally, with our * {margin:0; padding:0;} reset we had removed the padding from the Send button, so it doesn't match the Reset button. (I don't know why the Reset button isn't also affected.) So we need to re-add the padding to make it match:
button[type=send] {padding:3px 8px;}
Interestingly enough, at least in Safari, this also adds back the other styling so the buttons match.
Styling Note: The <select> and <input type="reset"> do not react consistently to styling; mostly they don't want to be styled at all. It may be possible to restyle them using javascript.
Contact form in php
The form you just created uses your email server to send the email. If you have access to a server that allows php (most standard servers do), then you can send an email without using your email server; it's cleaner, and you also get a "Thank you for sending your message" page. The files are more complex than what we just created, but here they are: NiceSimpleContactForm.zip
Note: Just remember to change the email address where indicated in the code, or it won't send.
Final Validation
If you are using Dreamweaver, look through the code for line numbers that are in red, indicating there is a problem. Click the red numbers and they should give you an idea what the problem is.
If Dreamweaver that you have unclosed elements and aren't sure what they are, you can insert your cursor before the </body> element at the bottom of your page, type </ and hit return, and it will auto complete whatever hasn't been closed. Look for those unclosed elements, close them, and try again until you get </body> right before </body>, and then you'll know all the unclosed elements. (Working on these instructions I had as many as six unclosed <p> elements I had to go back and find.)
Once you've fixed all the line number errors, go to File>Validate>Current Document (W3C) and your document will be validated.
W3C HTML Validator
If you don't have Dreamweaver, copy the code from your page, go to the HTML Validator at https://validator.w3.org/, paste your code in, and it will tell you on which lines your html has errors. Fix the code and repeat the process until you don't have any errors.
If you are having problems with your css, they also have a CSS Validator at https://jigsaw.w3.org/css-validator/.